2026 Top Guide How to Replace Kids Electric Car Batteries Safely

Time:2026-10-02 Author:Mason
0%

Replacing a child’s ride-on car battery looks simple, but a small mistake can damage wiring, cause sparks, or create a fire risk. This 2026 guide explains How to replace batteries for kids electric cars safely, using careful inspection and manufacturer-approved parts. It focuses on practical details, including voltage, battery chemistry, connector type, polarity, charging, and secure installation.

Professor Paul Christensen, a leading battery-safety researcher, has warned, “Lithium-ion batteries are very safe, but they are not without risk.” His point matters here. A toy vehicle may use a sealed lead-acid battery, lithium-ion pack, or another design. They are not interchangeable. Check the label under the seat, photograph the wiring, and confirm the replacement battery matches the original voltage and capacity. Guessing is unsafe.

Work on a dry floor with the car switched off and unplugged. An adult should remove the seat, disconnect the negative terminal first, and keep metal tools away from both terminals. Look for melted insulation, swelling, corrosion, or a sharp chemical smell. Stop if anything seems unusual. Really stop.

Connect the replacement battery with matching polarity. Tighten terminals firmly, but do not crush them. Replace damaged fuses with the correct rating, never a larger one. Secure the battery so it cannot slide during driving. Keep children away during the repair. Charge only with the correct charger, and supervise the first charging cycle in a visible, ventilated area. Some details may differ by model, and that uncertainty deserves respect. When the old battery is removed, take it to an approved battery-recycling location rather than placing it in household waste.
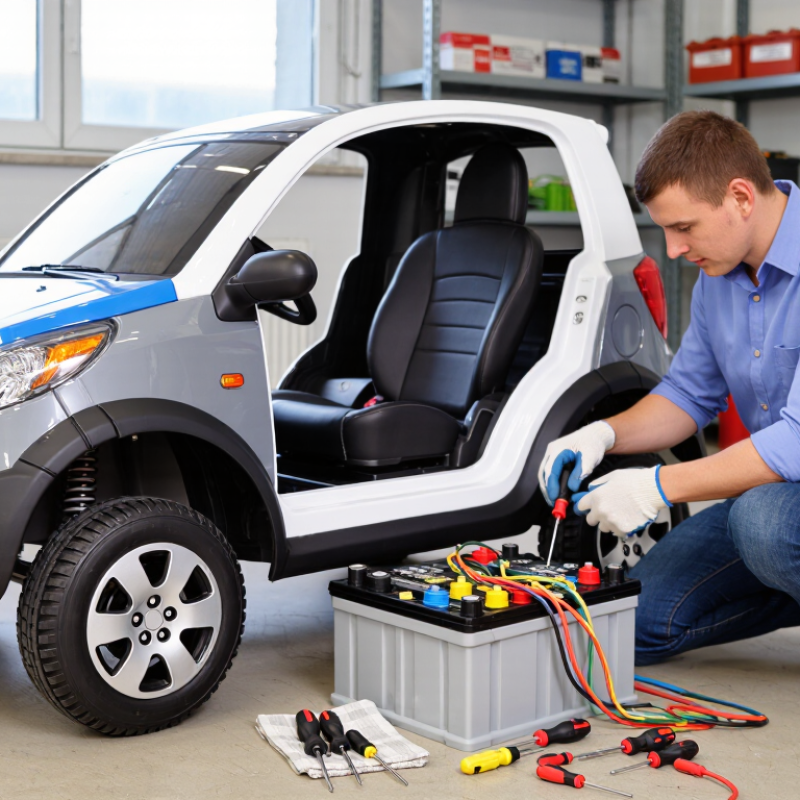
2026 Top Guide How to Replace Kids Electric Car Batteries Safely

Identify the Correct Replacement Battery and Required Safety Gear

Replacing a children’s electric car battery starts with identification, not speed. Read the original label and record voltage, amp-hour rating, chemistry, dimensions, connector, and polarity. Match the charger’s output exactly. A similar-looking 12-volt battery may still charge incorrectly. Sealed lead-acid and lithium-ion batteries are not interchangeable. Check carefully.

The U.S. Consumer Product Safety Commission warns that damaged or incompatible rechargeable batteries can overheat, ignite, or rupture. Its incident reporting repeatedly links failures with charging and battery misuse. The National Fire Protection Association also records more than one million fires annually in the United States, reinforcing the need for controlled charging areas. Keep the replacement away from carpets, sunlight, water, and children. Do not use a swollen, cracked, leaking, or unusually hot battery. I still recheck polarity twice; one small mistake can damage the car.

Required gear is simple but purposeful: safety glasses, chemical-resistant gloves, closed shoes, and an insulated screwdriver. Remove jewelry and keep a dry cloth nearby. Ventilate the area, especially with lead-acid batteries. Disconnect the charger and remove the car’s main fuse before touching terminals. Photograph the wiring first. That step feels unnecessary, but it prevents guesswork later. The Occupational Safety and Health Administration recommends controlling electrical energy before maintenance; even low-voltage toys deserve that habit. Never lift a heavy battery by its wires. After installation, inspect the connector, secure the battery, and stop immediately if charging produces heat, odor, swelling, or unusual noise.

2026 Top Guide: How to Replace Kids Electric Car Batteries Safely — Identify the Correct Replacement Battery and Required Safety Gear

Check or Data Dimension Typical Information What to Confirm Before Purchase Safety Relevance
Nominal system voltage 6 V, 12 V, or 24 V systems are common in children's ride-on vehicles. Match the voltage printed on the original battery, vehicle label, or operating manual exactly. A different voltage can damage the charger, wiring, motor, or control board and may create a fire risk.
Battery chemistry Sealed lead-acid batteries are widely used; some newer vehicles use lithium-ion battery packs. Use the same chemistry unless the vehicle manufacturer specifically approves a conversion. Lead-acid and lithium batteries require different charging, protection, connectors, and operating procedures.
Capacity Often stated in ampere-hours (Ah), such as 4 Ah, 7 Ah, 9 Ah, or 12 Ah, depending on vehicle size. Choose the original Ah rating or a replacement explicitly listed as compatible with the vehicle. A higher capacity may require more charging time and must fit the charger and battery compartment specifications.
Physical dimensions Common small sealed lead-acid formats are approximately 70–150 mm wide, 45–100 mm deep, and 90–100 mm high, but sizes vary substantially. Measure the battery compartment, retaining bracket, terminal position, and cable clearance. A loose or oversized battery can move, short against metal parts, or damage wires during operation.
Terminal and connector type Common arrangements include flat blade terminals, threaded terminals, or a vehicle-specific plug harness. Match terminal size, polarity, connector shape, wire gauge, and positive/negative orientation. Reversed polarity or forced connectors can cause sparks, blown fuses, or electronic damage.
Charger compatibility Chargers are designed for a specific voltage and battery chemistry; output current varies by model. Confirm the charger output voltage, plug polarity, chemistry setting, and approved battery capacity range. An incompatible charger can overcharge the battery, overheat wiring, or cause a thermal event.
Fuse and protection Many vehicles include an inline fuse or resettable protection device near the battery or wiring harness. Replace a fuse only with the same type and rating shown on the original fuse or manual. Never bypass a fuse or install a higher-rated fuse to stop nuisance trips.
Battery condition A safe replacement should be dry, clean, undamaged, and free from swelling, cracks, leaks, or corrosion. Do not install a battery with a damaged case, bent terminals, exposed cells, or unknown storage history. Physical damage can lead to leakage, short circuits, overheating, or loss of capacity.
Required safety gear Safety glasses, insulated gloves, closed-toe shoes, and non-metallic tools are recommended. Keep metal jewelry, watches, loose clothing, and conductive objects away from the terminals. Protects against sparks, short-circuit heat, corrosive electrolyte, and accidental contact.
Work area Use a dry, well-ventilated, stable area away from flames, smoking, heaters, and children. Turn the vehicle off, remove the key or remote control, and disconnect the charger. Reduces the chance of electric shock, ignition, accidental movement, and unauthorized handling.
Replacement sequence Photograph wiring; disconnect negative first; disconnect positive; remove the restraint; install the new battery securely; reconnect positive first, then negative. Follow the vehicle manual if its sequence differs, especially for lithium battery packs or sealed connectors. The sequence helps reduce accidental short circuits between a live terminal and the vehicle frame.
Final inspection Check secure mounting, correct polarity, intact insulation, tight terminals, unobstructed ventilation, and fitted fuse protection. Test charging and driving only after the battery compartment is closed and all wiring is protected. Prevents movement-related shorts, exposed conductors, overheating, and accidental contact.
Stop-work conditions Stop if there is smoke, hissing, unusual heat, swelling, strong odor, liquid leakage, or repeated fuse failure. Move away from the vehicle if safe to do so and obtain qualified service; do not open a sealed lithium pack. These signs may indicate an internal fault, short circuit, overcharge, or thermal runaway risk.
Important: The original battery label and vehicle manual take priority over general specifications. Never mix battery chemistries, bypass protective devices, or substitute a charger without confirming compatibility.

Disconnect Power and Prepare the Kids’ Electric Car Safely

Before replacing a kids’ electric car battery, disconnect every power source. Turn off the car and remove the key or control switch. Unplug the charger from the wall and the vehicle. Wait several minutes before opening the battery compartment. Small electrical systems can still hold residual energy.

Move the car to a dry, well-ventilated area with a clear floor. Keep children, pets, flames, and metal objects away from the workspace. Wear safety glasses and insulated gloves. Read the vehicle manual carefully, especially the battery voltage, connector shape, and cable layout. Photograph the original connections before removing anything. This simple step prevents many wiring mistakes.

Check the battery case, wires, fuse, and terminals for swelling, cracks, melted plastic, or corrosion. Do not continue if you see serious damage. A qualified technician should inspect it. Use insulated tools, and never allow a metal tool to bridge the terminals. Disconnect the negative cable first, then the positive cable, if the manual permits this order. Some designs differ, so guessing is unsafe. I once found a connector that looked loose but was firmly locked; forcing it could have damaged the housing. Slow inspection is not wasted time. Keep removed screws in a small container, because one missing fastener can leave the compartment unsafe.

Remove the Old Battery Without Damaging Wires or Connectors

Park the car on a flat, dry surface before opening the battery compartment. Switch it off, remove the charging lead, and keep the key away from children. Allow the motor and battery area to cool. Read the vehicle’s wiring diagram or service instructions before touching any connection. Do not guess. Photograph every wire, plug, and terminal from several angles. These images can prevent reversed connections later.

Remove the cover with the correct screwdriver, then place the screws in a small container. Grip each connector by its plastic housing, never by the wires. If a plug feels stuck, check for a locking tab instead of forcing it. Use insulated tools around exposed terminals, and keep metal objects away from both contacts. An old battery may be heavier than expected, so support it with both hands. If it looks swollen, cracked, leaking, or unusually hot, stop handling it and seek qualified service.

Before lifting the battery out, confirm that every lead is free. Mark unclear wires with removable labels. Inspect the connector ends for melting, corrosion, loose pins, or brittle plastic. That detail is easy to miss. In practical repairs, rushing creates more damage than the battery replacement itself. Take a pause. Lift the battery straight out, keeping wires away from sharp edges. Place it upright in a cool, dry location, and arrange proper recycling through an approved local collection service.

Install and Secure the New Battery Using the Correct Polarity

Replacing a kids’ electric car battery is mainly a polarity and connection job. The positive cable must reach the terminal marked “+,” while the negative cable connects to “−.” Never trust wire color alone. Older repairs can hide mistakes.

The U.S. Consumer Product Safety Commission’s 2023 toy-injury report estimated 231,000 toy-related emergency-room injuries. That figure is not battery-specific, but it supports careful assembly around children.

Disconnect the charger and remove the old battery before touching any terminals. Photograph the original wiring, then inspect the fuse, connectors, insulation, and battery tray for heat marks or cracks. A loose connector can spark under load.

Check the replacement battery’s voltage, chemistry, dimensions, and connector type against the vehicle manual. IEC 62133-2 safety requirements emphasize controlled battery construction and protection from abnormal use.

Install the battery upright, if specified, and secure it with the original restraint or a nonconductive strap. It should not slide when the car moves.

Tighten terminals firmly, but do not crush them. Keep metal tools away from both posts.

Test carefully. First, confirm polarity with a multimeter.

Then connect the charger only after the battery is secured. Turn the vehicle on with the wheels lifted and watch for heat, odor, smoke, or unusual sounds. Stop immediately if anything feels wrong. I once overlooked a slightly loose terminal; it caused intermittent power and unnecessary troubleshooting. That small mistake is worth remembering.

Test the Car and Dispose of the Used Battery Responsibly

After installing a replacement battery, test the children’s electric car before allowing a child to ride. Check that the battery is firmly secured, with no exposed wires, cracked casing, or loose terminals. Use a multimeter to measure voltage, following the vehicle’s manual and battery specifications. A reading near the rated voltage is reassuring, but it does not prove the battery can supply enough current. Test under load.

Keep the wheels lifted safely, then press the accelerator briefly. Confirm smooth starting, normal sound, brake release, and reliable stopping. Watch for heat, smoke, swelling, or a sharp chemical smell. Stop immediately if anything seems unusual. I have found that rushed testing often misses loose connectors. That mistake deserves more attention. The U.S. Consumer Product Safety Commission links damaged lithium-ion batteries with fire risks, so never test a swollen or leaking unit. Move it away from flammable materials and seek qualified disposal guidance.

Do not place used batteries in household rubbish or ordinary recycling bins. The U.S. Environmental Protection Agency reports that about 99 percent of lead-acid batteries are recycled, showing the value of dedicated collection systems. Lithium-ion batteries require separate handling because damaged cells can ignite during transport or processing. Tape exposed terminals, keep the battery upright, and contact a certified battery recycler or local household hazardous-waste facility. Keep children away. Follow the facility’s packaging instructions, even when they seem inconvenient.

2026 Top Guide: How to Replace Kids’ Electric Car Batteries Safely

Approximate open-circuit voltage readings for a 12V lead-acid battery after resting without a charger or load. Always confirm the battery type and voltage on the vehicle label or manual before replacement.

A fully charged 12V lead-acid battery typically measures about 12.6–12.8V after resting. A reading near 12.0V indicates a deeply discharged battery, but voltage alone does not prove battery health. Disconnect power before replacement, match the original voltage and connector polarity, test the car in a clear area, and take the used battery to an authorized battery-recycling or household hazardous-waste collection point. Never place a rechargeable battery in general household trash.

FAQS

How do I identify the correct replacement battery?

Record the original voltage, amp-hour rating, chemistry, dimensions, connector, and polarity. Match the charger’s output exactly. Similar appearance is not enough.

Can different battery chemistries replace each other?

No. Sealed lead-acid and lithium-ion batteries are not interchangeable. The charger and vehicle must support the selected chemistry. Check twice.

What safety gear should I wear?

Use safety glasses, chemical-resistant gloves, closed shoes, and an insulated screwdriver. Remove jewelry. Keep a dry cloth nearby.

Where should I replace and charge the battery?

Work on a dry, clear floor with good ventilation. Keep carpets, sunlight, water, children, pets, and flames away. A controlled space matters.

How should I disconnect the car before replacement?

Turn off the car and remove its key or control switch. Unplug the charger from the wall and vehicle. Wait several minutes. Remove the main fuse if instructed.

What should I inspect before removing the old battery?

Check the case, wires, fuse, terminals, connector, and surrounding plastic. Look for swelling, cracks, leaks, corrosion, or melted areas. Stop if damage appears serious.

Why should I photograph the wiring first?

A clear photo records cable positions, connector direction, and polarity. It reduces guesswork during installation. This step feels unnecessary, but it helps.

How should I reconnect the replacement battery?

Follow the vehicle manual, because cable orders can differ. Secure the battery firmly and never lift it by the wires. Use insulated tools. Do not bridge terminals.

What signs mean I should stop charging?

Stop immediately if the battery becomes hot, smells unusual, swells, leaks, or makes strange noises. Disconnect power safely. A qualified technician should inspect it.

Conclusion

How to replace batteries for kids electric cars safely begins with choosing a compatible replacement battery that matches the car’s voltage, size, connector, and chemistry. Before starting, gather safety gear such as insulated gloves and eye protection, switch off the car, remove the key or remote connection, and work in a dry, well-ventilated area. Keep tools and metal objects away from the battery terminals.

Disconnect the power carefully and photograph or label the existing wire connections before removing the old battery. Lift it out without pulling, twisting, or cutting the wires, then inspect the connectors for damage. Install the new battery with the positive and negative terminals matched exactly to the car’s wiring, secure it firmly so it cannot move, and close the battery compartment. Test the controls, brakes, lights, and charging function under supervision. Place the used battery in a safe container and take it to an approved battery recycling or collection facility instead of discarding it with household waste.

Mason

Mason

Mason is a seasoned marketing professional with a deep expertise in the company's offerings and a passion for driving brand awareness. With a strong background in digital marketing strategies, he has an innate ability to connect with diverse audiences and effectively communicate product benefits.......